Device Settings Table
To access Devices, go to  > Settings > Control Panel > Devices.

Screenshot above shows the Device table. As you can see, table shows a list of devices with their basic parameters:
- Name
- IP Address
- Port
- SNMP Policy
- SNMP Version
- Device Type
Add New Device
Devices are automatically added when device nd NetFlow module (Read more about Device Discovery and Working with Exporters). It is also possible to manually add a new device.

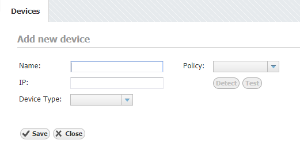
On the screenshot "Adding device" above you can see device parameters: Name, IP address, Policy and Device Type. Name is used to identify the device in the application, and IP to identify the device in the network.
To add new device:
- Click on add button the above top right corner of device table.
- Set Name, IP Address and Device Type. Policy is optional and does not have to be set.
- Click Save
Choosing a policy:
- If you know the SNMP configuration of the device and the corresponding policy, you can choose the policy from the Policy drop-down list.
- If you do not know the SNMP configuration of the device and the corresponding policy, click on the Detect and the application will try each policy defined in the application on the device specified. If successful, the Policy field will be automatically updated.
- Additionally, you can test if the set device works by clicking on the Test button.
Edit Device
Looking at the first device “cisco2950-xx” you can see that the its IP address is x.x.3.84 and that the policy used on the device is “public”. Furthermore, you can see that the said policy is SNMP v2c and that the UDP port used for SNMP is 161. We can also see that this it belongs to Cisco Router type of devices.

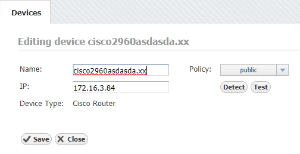
On the screenshot "Editing device" above you can see device parameters: name, IP address and policy.
- Click on pen (edit icon), or double click on the Device table row
- Set Name, IP address or Policy(you can not edit device type)
- Click Save