| Warning | ||
|---|---|---|
| ||
For security reason, make sure that your server or VM doesn't have anything installed on it before NetVizura installation. Other software of services running on the same server can impact installation. |
| Warning | ||
|---|---|---|
| ||
Before installing NetVizura make sure to set the time on your server correctly. Time change after the installation will invalidate the license! |
| Warning | ||
|---|---|---|
| ||
NetVizura requires working connection to the internet to install required dependent software. After installation is successful you can turn off internet access for NetVizura server. |
| Info |
|---|
Before installing NetVizura you will have to install: Java 1.8, Tomcat 7 or higher and PostgreSQL 9.5 12 or higher (9.6 recommended), in that order. The installation process has been tested on Windows Server 2008 R2 (64bit), Windows Server 2012 R2 (64bit), Windows Server 2016 R2 (64bit) and Windows Server 2019 (64bit) and Windows Server 2022 (64bit). |
Installation Steps
To install NetVizura on Windows follow these steps:
Step 1: Download and install Oracle Java 8 from Oracle official website www.oracle.com/technetwork/java/javase/downloads/index.html , or if you don't have support agreement with Oracle,you can download openJDK build from :https://github.com/ojdkbuild/ojdkbuild . In openJDK case,you should download .msi file eg. https://github.com/ojdkbuild/ojdkbuild/releases/download/1.8.0.212-1/java-1.8.0-openjdk-1.8.0.212-1.b04.ojdkbuild.windows.x86_64.msi .
Only 64-bit Java is supported, so choose Windows x64 installer. We recommend JDK package because it helps with troubleshooting.
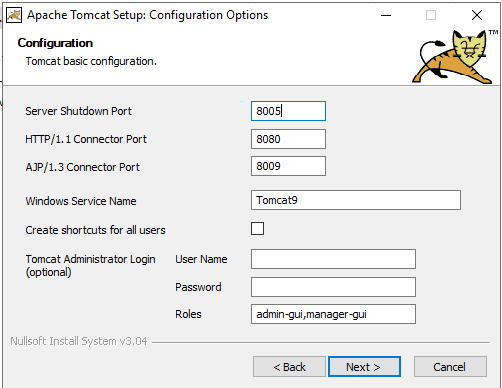
Step 2: Download and install Tomcat 7 (or higher- 9 (Tomcat 10 is not supported currently) as a service from Tomcat official website website tomcat.apache.org. 32-bit/64-bit Windows Service Installer is available on the downloads page.
| Note |
|---|
|
When prompted for the installation type, choose Full installation. This will enable Tomcat to start on boot.
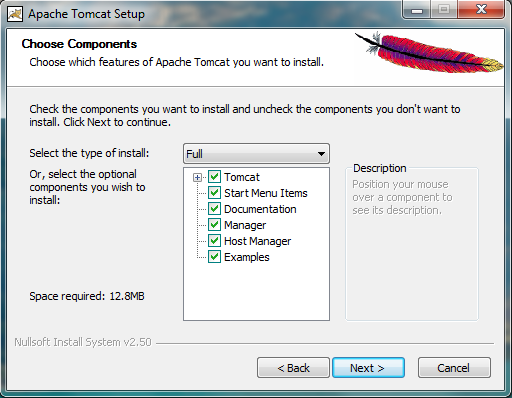
. Server Shutdown port should be set to 8005.
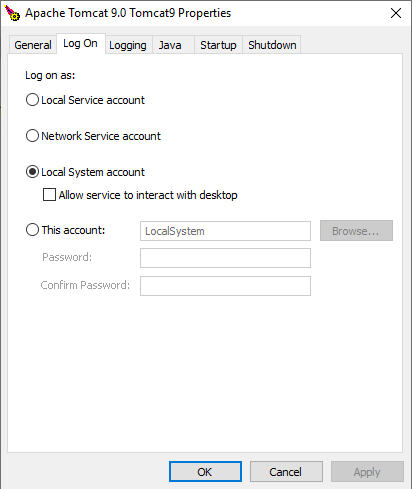
| Note | ||
|---|---|---|
| ||
After the installation is complete you need to set Local System account for the application,and restart it.
|
Step 3: Download and install PostgreSQL 9.5+ 12 or higher version from PostgreSQL official website https://www.enterprisedb.com/downloads/postgres-postgresql-downloads
| Note |
|---|
|
Step 4: Install Elasticsearch
Download the Elasticsearch installer from: https://www.netvizura.com/files/products/general/downloads/elasticsearch-7.17.8.exe
Execute the file with run as admin , and follow the installation.
Step 5: Download NetVizura Windows Installer from NetVizura website and run installer with administrative privileges
Step 56: Follow the installation steps
Step 67: Verify installation
| Excerpt Include | ||||||
|---|---|---|---|---|---|---|
|
| Anchor | ||||
|---|---|---|---|---|
|
After installation tweaking of configuration files is required in order to utilize the installed RAM to the fullest extent. The main consumers of RAM are operating system, PostgreSQL database and Tomcat. General rule for distributing memory is to split it in ratio 2:1 between PostgreSQL and Tomcat with 1 GB or more reserved for operating system. For instance:
Installed RAM | PostgreSQL | Tomcat | OS |
|---|---|---|---|
| 4 GB | 2 GB | 1 GB | 1 GB |
| 16 GB | 10 GB | 5 GB | 1 GB |
Tweaking PostgreSQL
Tweaking PostgreSQL for best performance is a topic on which many books were written, but the following are some common sense suggestions. For the curious ones recommended reads (among countless others) are PostgreSQL Optimization Guide, and PostgreSQL Tuning Guide, this article and this book.
In order to apply following tweaks edit file postgresql.conf, this file is usually located in PostgreSQL data folder. You will need to restart the PostgreSQL service after done editing. Almost all of the following parameters are commented with carron character (#). Be aware that if you comment out the parameter that has been changed, PostgreSQL will revert to the default value.
| Excerpt Include | ||||||
|---|---|---|---|---|---|---|
|
| Panel | ||||||||
|---|---|---|---|---|---|---|---|---|
| ||||||||
|
| Warning |
|---|
For the NetVizura 5.x, having MS Edge, Firefox or Chrome browser is mandatory requirement. |
| Tip |
|---|
Note that NetVizura demands postgresql installer which includes Microsoft Visual C++ pre-installation. Make sure that the postgresql installer you have downloaded installs Microsoft Visual C++ before postgres installation starts. Otherwise, you will need to install it manually. |
Tomcat Memory Allocation
During installation NetVizura automatically allocates memory for Tomcat process. The amount allocated to Tomcat process is calculated according to the formula:
(RAMtotal - 1GB) / 3 but no less than 1GB.
For instance:
Total RAM | Tomcat |
|---|---|
| 3 GB | 1 GB |
| 4 GB | 1 GB |
| 16 GB | 5 GB |
However, if you need to tweak Tomcat RAM allocation differently (the example for 2048MB):
- Double click on Apache Tomcat Properties in system tray
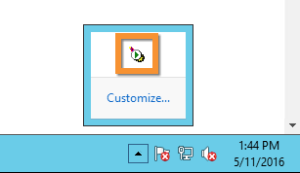
- In Java tab under Java options modify the
-Xmxparameter to allocate additional memory to Tomcat. Additionally, set parameter-Xmsto the same amount. Also set Initial memory pool and Maximum memory pool to the same amount. This should look like on picture below.
- Back to the General tab, click Stop and Start to restart Tomcat.