NetVizura needs dedicated server
For security reasons, make sure your server or VM has no software installed before installing NetVizura. Other software of services running on the same server can impact installation.
NetVizura needs correct time
Before installing NetVizura, make sure the time on your server is set correctly. Time change after the installation will invalidate the license!
NetVizura installation needs internet access
NetVizura requires an active internet connection to install the required dependent software. After the installation is successful, you can disable internet access for the NetVizura server.
Before installing NetVizura, you will have to install: Java 1.8, Tomcat 7 or higher,PostgreSQL 12 or higher, and Elasticsearch 8, in that order. The installation process has been tested on Windows Server 2008 R2 (64-bit), Windows Server 2012 R2 (64-bit), Windows Server 2016 R2 (64-bit), Windows Server 2019 (64-bit), and Windows Server 2022 (64-bit).
Installation Steps
To install NetVizura on Windows, follow these steps:
Step 1: Download and install Oracle Java 8 from the Oracle official website www.oracle.com/technetwork/java/javase/downloads/index.html , or if you don't have a support agreement with Oracle,you can download openJDK build from :https://github.com/ojdkbuild/ojdkbuild . In the openJDK case,you should download the .msi file, e.g., https://github.com/ojdkbuild/ojdkbuild/releases/download/1.8.0.212-1/java-1.8.0-openjdk-1.8.0.212-1.b04.ojdkbuild.windows.x86_64.msi .
Only 64-bit Java is supported, so choose the Windows x64 installer. We recommend the JDK package because it helps with troubleshooting.
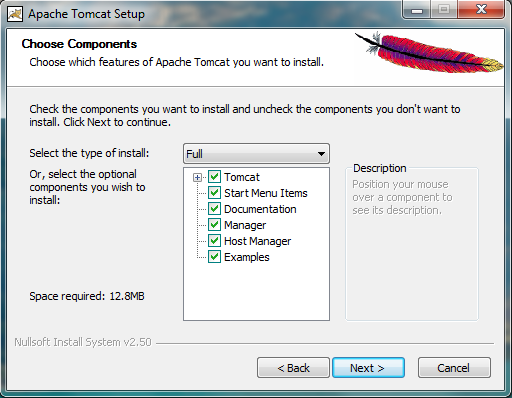
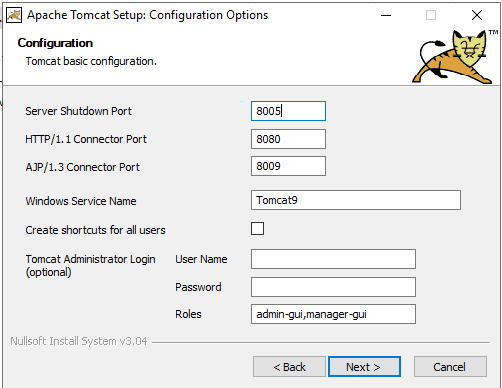
Step 2: Download and install Tomcat 7 - 9 (Tomcat 10 is not supported currently) as a service from Tomcat official website tomcat.apache.org. 32-bit/64-bit Windows Service Installer is available on the downloads page.- Make sure to install Tomcat as a service; otherwise, the NetVizura installation will not complete successfully.
- Make sure you have exactly one version of Tomcat installed on your system; otherwise, the application might not work as expected.
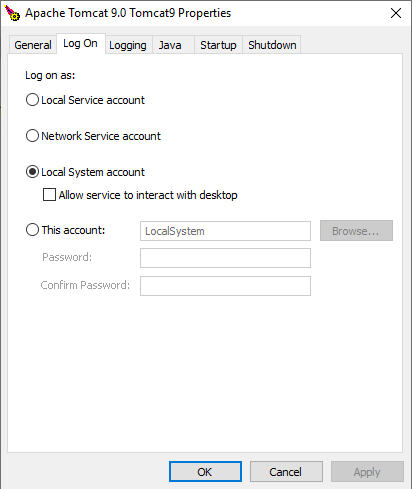
Windows 2019 users
After the installation is complete, you need to set the Local System account for the application and restart it.
Step 3: Download and install PostgreSQL 12 or higher version from the PostgreSQL official website https://www.enterprisedb.com/downloads/postgres-postgresql-downloads
- While installing PostgreSQL, you will be prompted for a password; make sure that you type in postgres
- Make sure you have exactly one version of PostgreSQL installed on your system, otherwise NetVizura might not work as expected or at all.
Step 4: Install Elasticsearch
Download the Elasticsearch installer from: https://www.netvizura.com/files/products/general/downloads/elasticsearch-8.19.10.exe
Run the file as admin and follow the installation.
Step 5: Download the NetVizura Windows Installer from NetVizura website and run the installer with administrative privileges
Step 6: Follow the installation steps
Step 7: Verify installation
Now you can go to NetVizura web interface http://<netvizura_server_ip>:8080/netvizura. Default login credentials: For example, if your server IP is 1.1.1.1, then point your browser to http://1.1.1.1:8080/netvizura, like in the screenshot below:
Post Install Steps
After installation, configuration files must be tweaked to utilize the installed RAM to the fullest extent. The main consumers of RAM are the operating system, the PostgreSQL database, and Tomcat. The general rule for allocating memory is to split it in a 2:1 ratio between PostgreSQL and Tomcat, with 1 GB or more reserved for the operating system. For instance:
Installed RAM | PostgreSQL | Tomcat | OS | Elasticsearch |
|---|---|---|---|---|
| 6 GB | 2 GB | 1 GB | 1 GB | 2 GB |
| 16 GB | 5 GB | 5 GB | 1 GB | 5 GB |
Tweaking PostgreSQL
Tweaking PostgreSQL for best performance is a topic on which many books were written, but the following are some common sense suggestions. For the curious ones, recommended reads (among countless others) are PostgreSQL Optimization Guide and PostgreSQL Tuning Guide.
In order to apply the following tweaks, edit the file postgresql.conf, this file is usually located in the PostgreSQL data folder. You will need to restart the PostgreSQL service after editing. Almost all of the following parameters are commented with a carron character (#). Be aware that if you comment out the changed parameter, PostgreSQL will revert to the default value.
In the following example, it is assumed that 4 GB of RAM is allocated for PostgreSQL. Before changing any parameters in PostgreSQL configuration, read the provided comments in the table below for more information regarding a specific parameter. The recommended amount is The formula used is Increasing parameter recommended value comment max_connections30 NetVizura rarely uses more than 10 connections simultaneously, but it is good to have some reserve. shared_buffers1024MB The recommended amount is RAM/4.effective_cache_size2048MB RAM/2, possibly even RAM * 3/4.checkpoint_completion_target0.7 This parameter can take values between 0 and 1. The default is 0.5, meaning the write phase of the checkpoint process will take half of the checkpoint timeout. Increasing this value will give the checkpoint write phase more time to complete, thereby reducing I/O usage. work_mem32-64MB max_connections*work_mem <= RAM/4, but using a bit more is still fine.maintenance_work_mem256MB Speeds up DB self clean process. Usually 4*work_mem or something in that ballpark wal_buffers16MB wal_buffers is helpful for write-heavy systems. Usually, this is 16MB.min_wal_size 1GB If WAL files are under this size, files will be recycled for future checkpoints. max_wal_size2GB The maximum size of WAL files, after which the CHECKPOINT command is issued, and files are written to disk. effective_io_concurrency2 The number of simultaneous requests that can be handled efficiently by the disk subsystem. full_page_writesoff Turning this parameter off speeds up normal operation but might lead to unrecoverable or silent data corruption after a power outage, OS failure, or HDD failure. The risks are similar to turning off fsync, though smaller.fsyncoff Don't wait for the HDD to finish the previous write operation. This brings the most benefit, but if there is a power outage, an OS or HDD failure at the exact instant when PSQL issues a write command to the HDD, that data will be lost, and the DB itself could be corrupted. On the other hand, DB can issue several times as many write commands in the same time period and consider them all done, thus improving write performance immensely. synchronous_commitoff Similar to "fsync" but with less benefit. Parallel system optimization (PSQL => 9.6) max_worker_processes2 Number of cores max_parallel_workers_per_gather1 Number of cores/2 (PSQL > 9.6) max_paralllel_workers2 Number of cores
For the NetVizura 5.x, having MS Edge, Firefox or Chrome browser is mandatory requirement.
Note that NetVizura demands postgresql installer which includes Microsoft Visual C++ pre-installation. Make sure that the postgresql installer you have downloaded installs Microsoft Visual C++ before postgres installation starts. Otherwise, you will need to install it manually.
Tomcat Memory Allocation
During installation NetVizura automatically allocates memory for Tomcat process. The amount allocated to Tomcat process is calculated according to the formula:
(RAMtotal - 1GB) / 3 but no less than 1GB.
For instance:
Total RAM | Tomcat |
|---|---|
| 3 GB | 1 GB |
| 4 GB | 1 GB |
| 16 GB | 5 GB |
However, if you need to tweak Tomcat RAM allocation differently (the example for 2048MB):
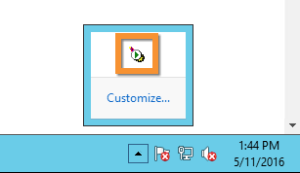
- Double click on Apache Tomcat Properties in system tray
- In Java tab under Java options modify the
-Xmxparameter to allocate additional memory to Tomcat. Additionally, set parameter-Xmsto the same amount. Also set Initial memory pool and Maximum memory pool to the same amount. This should look like on picture below.
- Back to the General tab, click Stop and Start to restart Tomcat.